I am the sysadmin for a small Computer Science department. Last summer (2020) one of our students (Jake Chanenson) helped us set up haproxy as a load-balancer for incoming ssh connections. This page describes our setup.
what we wanted
As a small CompSci department we maintain our own servers (email, web, dns, ldap, etc) and lab computers. We have a few different computer labs on campus, with 100+ linux lab computers in total. When students work from their dorms or remotely, they typically ssh in to access our lab computers and resources. Instead of having to remember specific computer hostnames, we wanted one name (e.g., lab.myschool.edu) that students could ssh to, which would load-balance the ssh connections across our various lab computers. Additionally, if any computers happen to reboot or be down, we wanted them automatically (and quickly) removed from the load-balancing rotation, and put back into the rotation when they were up again.
docs we followed
- Eugene Petrenko’s blog post on Load Balancing SSH
- haproxy documentation
- Evan Carmi’s blog post on Setup HAProxy stats over HTTPS
the setup
- one server (we use debian) runs haproxy (v1.8.19) and has the hostname you want the students to use when connecting (e.g.,
ssh lab.myschool.edu) - nobody actually logs in to the haproxy server except admins, so you don’t need to set up student accounts on the haproxy server
- set up haproxy to bind to port 22 (see the
listen sshpart of the config file below) - also set up sshd on the haproxy server to run on a different port (we use
Port 9000in/etc/ssh/sshd_config) so your admins can still get to it (ssh -p 9000 lab.myschool.edu) - set up the same ssh host keys for all of the lab computers you want in the load-balancing rotation, otherwise your users will get WARNING SSH HOST KEY CHANGED messages each time they get sent to a different computer
- you probably want to put all of these ssh host pub keys in a
/etc/ssh/ssh_known_hosts2file, and distribute it to all of your lab computers
For example, here’s a simplified section of our ssh_known_hosts2 file (with fake names and IP addresses), only showing one of the key types (ed25519) for each host:
lab,lab.myschool.edu,1.2.3.1 ssh-ed25519 AAAAO3Nzaer56DI1NTE5AAAAIJfPzJHRiiiwhrGposISykHMLvpcowKnjRbUxb028Klx root@hostA
hostA,hostA.myschool.edu,1.2.3.10 ssh-ed25519 AAAAO3Nzaer56DI1NTE5AAAAIJfPzJHRiiiwhrGposISykHMLvpcowKnjRbUxb028Klx root@hostA
hostB,hostB.myschool.edu,1.2.3.11 ssh-ed25519 AAAAO3Nzaer56DI1NTE5AAAAIJfPzJHRiiiwhrGposISykHMLvpcowKnjRbUxb028Klx root@hostA
hostC,hostC.myschool.edu,1.2.3.12 ssh-ed25519 AAAAO3Nzaer56DI1NTE5AAAAIJfPzJHRiiiwhrGposISykHMLvpcowKnjRbUxb028Klx root@hostA
So each lab computer (hostA, hostB, hostC) has the same ssh_host_ed25519_key and ssh_host_ed25519_key.pub files (in /etc/ssh). Do the same for any other host key types you use (rsa, ecdsa, etc). If a student ssh’s to any of those hosts, with any name or number (hostA, hostB.myschool.edu, 1.2.3.12), they should see the same ssh host key.
And here’s a simplified version of our /etc/haproxy/haproxy.cfg file (from a server running Debian 10 (Buster)):
global
	log /dev/log	local0
	log /dev/log	local1 notice
	chroot /var/lib/haproxy
	stats socket /run/haproxy/admin.sock mode 660 level admin expose-fd listeners
	stats timeout 30m
	maxconn 2500
	user haproxy
	group haproxy
	daemon

defaults
	log	global
	mode	tcp
	timeout connect 10s
	timeout client 36h
	timeout server 36h
	option	dontlognull
	errorfile 400 /etc/haproxy/errors/400.http
	errorfile 403 /etc/haproxy/errors/403.http
	errorfile 408 /etc/haproxy/errors/408.http
	errorfile 500 /etc/haproxy/errors/500.http
	errorfile 502 /etc/haproxy/errors/502.http
	errorfile 503 /etc/haproxy/errors/503.http
	errorfile 504 /etc/haproxy/errors/504.http

listen ssh
	bind *:22
	balance leastconn
	mode tcp

	option tcp-check
	tcp-check expect rstring SSH-2.0-OpenSSH.*

	server hostA  1.2.3.10:22 check inter 10s fall 2 rise 1
	server hostB  1.2.3.11:22 check inter 10s fall 2 rise 1
	server hostC  1.2.3.12:22 check inter 10s fall 2 rise 1
# lots more hosts here (we currently have 42 hosts in here)

listen stats
	mode http
	maxconn 15
	bind *:443 ssl crt /etc/letsencrypt/live/lab.myschool.edu/haproxy.pem
	stats enable
	stats show-node
	stats uri /stats
	stats refresh 10s
	stats auth adminname:adminpassword
	stats hide-version
Some things to note in the above config:
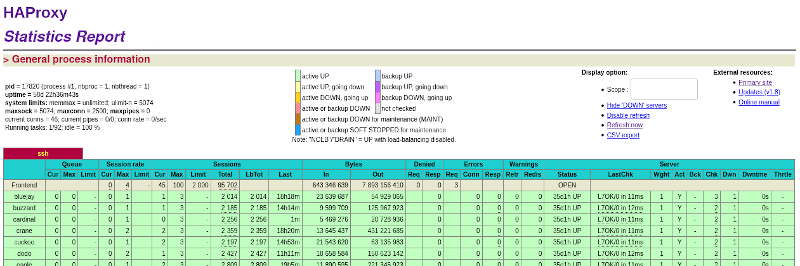
- we publish the stats for haproxy to
https://lab.myschool.edu/stats, which our admins can use to monitor the service - see Evan Carmi’s blog post on Setup HAProxy stats over HTTPS for how to set up https for the stats page (we use certbot and letsencrypt for our ssl certificate (e.g.,
certbot certonly --standalone, and then combine the pem files using a certbot post renewal hook:cat cert.pem privkey.pem > haproxy.pem)) - the
tcp-checkline means it is looking for a string that starts with SSH-2.0-OpenSSH when checking if the ssh service is up on each host. Trytelnet hostname 22to see what your sshd prints. - for each server line, the
check inter 10s fall 2 rise 1part controls how haproxy checks (every 10 sec) for offline (2 failed checks) and online (1 successful check) hosts - we set the timeouts to 36 hours, since students sometimes set up long-running (overnight) jobs, and we figured they would check back in on them after 12-24 hours
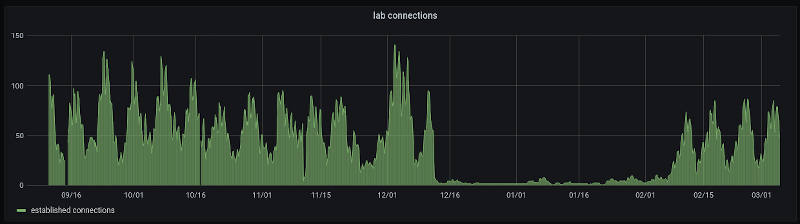
- not shown here, we also use zabbix (
system.run[netstat -a -n | grep ESTABLISHED | wc -l]) and grafana to make a pretty dashboard showing connections to haproxy vs time, so we can see how the service is used during the week

results
So far (almost two full semesters) everything has performed flawlessly. Students have used the service continuously, with sometimes close to 150 current connections:
We originally set this service up using round-robin DNS. That worked, but was limited in the number of hosts we could use (for us, less than 10). It was also slow to respond to unreachable hosts (we had to notice the host was down, then change the dns records to remove the host, then worry about cached dns data).
Pros and cons:
- pro: single hostname for students to remember (
lab.myschool.edu) - pro: hosts quickly and automatically taken out of the rotation if offline, added back when online
- pro: ssh load-sharing across 40+ computers
- pro: easy to monitor (see stats example below)
- con: one single point of failure if our haproxy server goes down (but students can still ssh directly to any lab computer)
- con: all computers need to have the same ssh host keys (not too hard if you already manage them with ansible)
I was originally unsure what size server would be needed for this. So far, even with 100+ connections, the server has shown very little memory usage and negligible CPU load. I’m guessing haproxy was built to withstand higher loads. I probably way over-bought for this server (128GB memory, 16 CPU cores).